
If you would like to download a pdf of this information right click on: Digitrax_DT402D_Duplex_Radio_Throttle_Firmware_Update_1
And also, if you have a Macintosh operating system you can partition part of your system to operate windows. Right click on this .zip file to download: DigiIPLII
Digitrax DT402D Duplex Radio Throttle Firmware Update
Introduction
Most Digitrax equipment, DT4xx, UR9x, Zephyr, Zephyr Extra and others, have the ability to upgrade their internal firmware (software on a chip). This is done to fix bugs or provide access to new features or change settings or just about any reason (a prime example is the new command station that has additional address slots that cannot be accessed unless you have a DT4xx with at least firmware version 2.1).
The procedure to do this is not difficult and is detailed in this updated document. The original document only mentioned the Digitrax PR3 as the computer interface. This update includes instructions for the RR-cirkits LocoBuffer interface. All of these updates are controlled by the DigiIPLII.exe program provided on the website.
All updates/additions to this documentation will be in the same blue color as this paragraph.
The following instructions are provided for upgrading Digitrax DT402D throttles to the latest Firmware Revision and optionally, when updating the RF24 Duplex Radio Module contained in the DT402.
Additions have been made for those that have a Locobuffer interface. The DigiIPL109 upgrade utility has been replaced by the DigiIPLII utility (and will be referred to throughout these instructions). To get this from the Digitrax web site you would have to install the newest SoundLoader utility which is overkill. Due to this, the file has been uploaded to the club website.
Note: The RF24 Duplex Radio Module is part of the DT402D Throttle and the UR92.
These instructions assume that a Digitrax PR3/Locobuffer has been properly installed, is connected to a Command Station (DCS100 & 200, DB150, DCS50 or DCS51) and working properly. It is also assumed that the DigiIPLII Utility and any required *.DMF files have been downloaded from http://www.digitrax.com prior to this Firmware update.
All downloadable firmware upgrade files are located on the Digitrax website here.
This update is recommended for Digitrax DT402D Throttles. It is an optional
update for other DT402 Series Throttles.
These instructions must be followed step by step to ensure the DT402 Series Throttle(s) are updated correctly.
Multiple Throttles can be upgraded at the same time. A splitter can be used to provide additional LocoNet jacks.
When updating any device with the DigiIPLII Utility, nothing should be plugged in or unplugged from LocoNet.
The following steps need to be taken before the Firmware Update can be started:
[if !supportLists]· [endif]Disconnect ALL LocoNet devices from the Command Station with the exception of the PR3/LocoBuffer. No other LocoNet devices should be plugged in at this time.
[if !supportLists]· [endif]Insert a known GOOD 9-volt battery into the DT402 Series Throttle(s) which are to be updated.
[if !supportLists]· [endif]Plug the DT402D Throttle(s) into LocoNet. It can be plugged into your command station or a UP5 whichever you prefer.
[if !supportLists]· [endif]To begin the Firmware Update, double click on the DigiIPLII.exe icon.
If the following Open File – Security Warning box is displayed, click ‘Run’
[if gte vml 1]>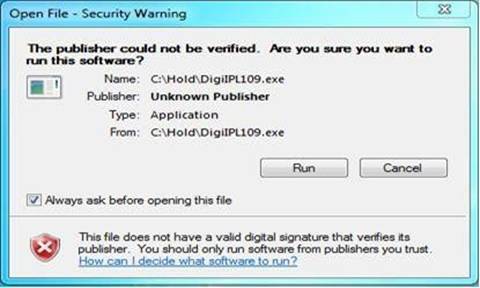
[endif][if gte vml 1]>
The DigiIPLII Utility should open and look similar to this:
[if gte vml 1]>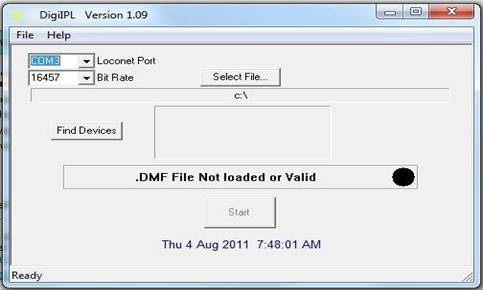
[endif][if gte vml 1]>
Verify that the proper PR3/LocoNet port is selected. This is the com port that the computer has assigned to the PR3/Loconet. Table 1 shows the bit rate settings selection for your type of interface. The bit rate should be set to the appropriate value.
Table [if supportFields]> SEQ Table \* ARABIC 1[if supportFields]> – Bit ratesInterface Bit Rate PR3 16457 LocoBuffer 56K
Click on the ‘Select File…’ box, navigate to the location where you saved the
dt402_r21_9dec11.dmf file, click on the filename to highlight it then click ‘Open’.
[if gte vml 1]>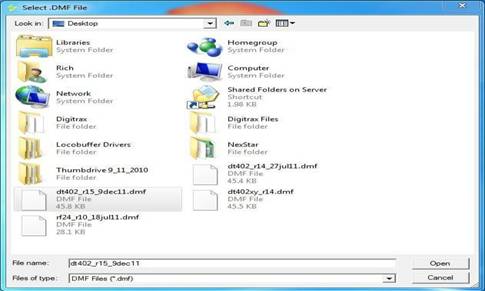
[endif][if gte vml 1]>
The program will go back to the main screen and look similar to this:
[if gte vml 1]>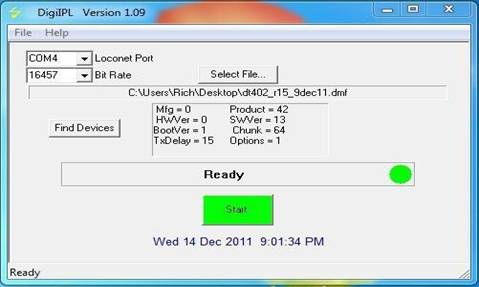
[endif][if gte vml 1]>
Click on the ‘Start’ button.
A progress bar will be displayed and will look similar to this:
[if gte vml 1]>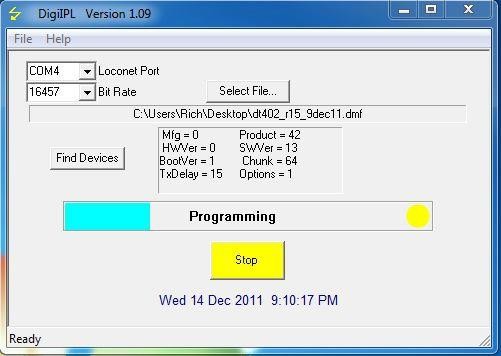 [endif]
While the Throttle(s) are being updated, the white Flashlight LED will blink and the Throttle Display will display ‘IPL Run’.
When the update completes, the Throttle(s) will reset and display DT402D21
The last 2 digits are the software version contained in the DT402’s firmware.
Unplug the Throttle(s) from LocoNet.
Remove the battery from the Throttle(s) and then reinsert the battery. Plug the throttle(s) back into Loconet.
The Throttle(s) should read DT402D21. If the Throttle(s) display doesn’t read DT402D21 or 8 dim blocks are displayed, the update did not finish correctly and will have to be run again. Repeat the steps to reprogram the Throttle(s).
NOTE: You may have to update a Throttle more than once for the update to be successful. This is not a big deal and nothing to worry about. Just do the steps.
NOTE: If updating a Throttle other than a Duplex Equipped Throttle, the display will be different. The last two digits displayed should read 21.
After successful completion of the update, click the ‘Find Devices’ box. A list of devices will appear in the Discover box.
Under the Select column click the row that displays DT402. The display will look similar to this:
[if gte vml 1]>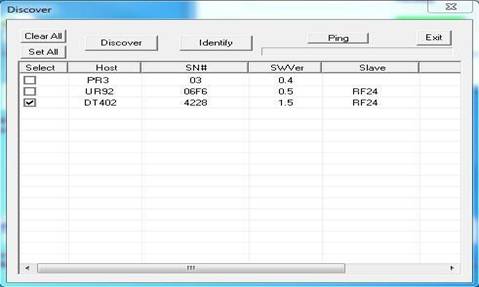
[endif][if gte vml 1]>
Next use the scroll bar at the bottom of the Discover box to scroll all the way to the right.
The display should look similar to this:
[if gte vml 1]>
[endif][if gte vml 1]>
The SWVer column next to the SN# column shows the current firmware version of each product detected. It should read 21 for your DT402 product.
If the FAR Right SWVer column reads 1.1, no further updates are required.
Reconnect all the LocoNet devices that were previously disconnected. Close out any DigiIPLII display boxes that are still opened. Return the layout to normal operation.
If the FAR Right SWVer column reads something other than 1.1, the RF24 Duplex Radio Module needs to be updated.
Use the following step to update the RF24 Duplex Radio Module:
Click on the ‘Select File…’ box, navigate to the location where you saved the rf24_r10_18jul11.dmf file, click on the filename to highlight it then click ‘Open’.
[if gte vml 1]>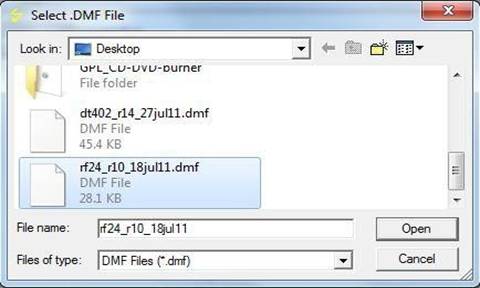
[endif][if gte vml 1]>
[if gte vml 1]>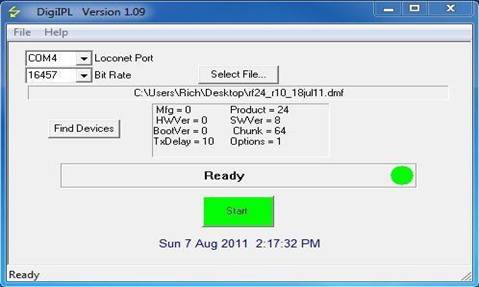 [endif]
Click on the ‘Start’ button
A progress bar will be displayed and will look similar to this:
[if gte vml 1]>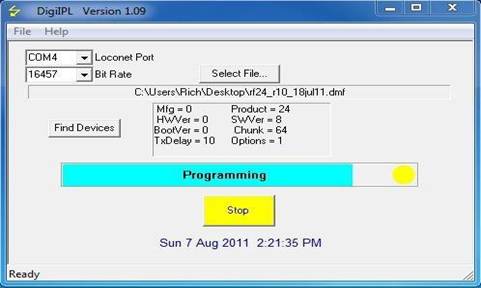
[endif][if gte vml 1]>
When the RF24(s) are finished updating, ‘RF24 IPL’ will still be displayed on the throttle(s) screen. This is NORMAL and an expected result when the RF24 is updated.
Unplug the Throttle(s) from LocoNet.
Remove and reinsert the battery from each Throttle. Plug the Throttle(s) back into LocoNet.
Click the ‘Find Devices’ box. A list of devices will appear in the Discover box.
Under the Select Column click the row that displays DT402. The display will look similar to this:
[if gte vml 1]>
[endif][if gte vml 1]>
Again, use the scroll bar at the bottom of the Discover box to scroll all the way to the right.
The display should look like this:
[if gte vml 1]>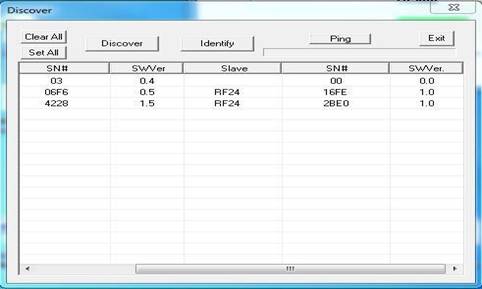 [endif]
If the far right SWVer column reads 1.1, the RF24 Duplex Radio Module has updated correctly.
Reconnect all the LocoNet devices that were previously disconnected. Close out any DigiIPLII display boxes that are still opened. Return the layout to normal operation.
If you wish to update the firmware and RF module of a UR9x product the procedure is the same as this.
Please contact the Helpdesk (helpdesk.digitrax.com) with any questions.
Tech Support is not configured to diagnose issues related to computer, operating system, hardware, configuration or other possible problem areas that may cause problems with running the DigiIPLII utility.